Note: If suggested wire lengths are too long to work with easily use shorter pieces and fasten ends together as shown in Figure A. Crimp loops tightly together so they will go through hole in beads.

SIDES OF BOAT
1. Using 11 ft of 24 ga wire string 1 pink 5mm faceted, 1 spaghetti, 1 pink 6mm faceted and 1 spaghetti bead. Center beads on wire. Bring one end of wire through last spaghetti bead on opposite side. (Figure B). Pull up firmly and keep ends even.

2. Add 1 pink 5mm faceted and 1 spaghetti to right wire and add 1 pink 5mm faceted to left wire. Bring left wire through the spaghetti bead on right wire. Continue until 33 spaghetti beads have been used. (Right wire becomes left wire and left becomes right as you work.)
3. To finish, add 1 pink 5mm faceted bead to each wire. Go through the first spaghetti bead from opposite ends with each wire. This will form a circle, and this spaghetti bead will be the front point of the boat. Work one wire through side pink 6mm faceted and down through spaghetti bead. Bring other wire through 6mm faceted on the right. Do not cut wire.
BOTTOM OF BOAT
1. Add 2 pink rondelles to right wire. Go through both rondelles from opposite through third pink 5mm faceted (from front of boat) on other side. Bring wire back through white rondelles and tighten. Run wire down through spaghetti bead and fasten off.
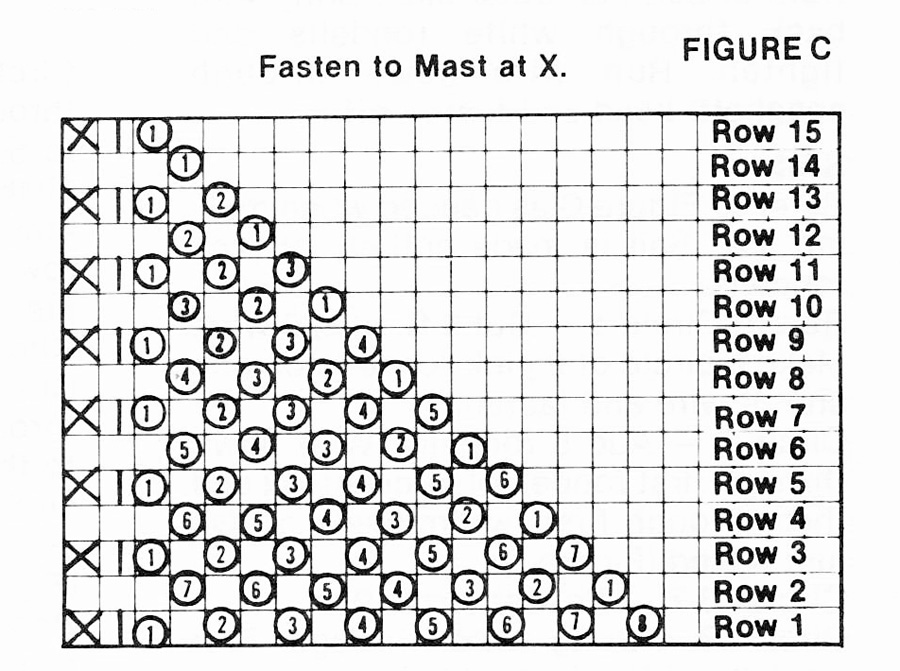
SAIL
Refer to Figure C as needed when making sail. Sail is made entirely of pink rondelle beads.
Row 1. Circle 1 - Cut 9 ft of 28 gauge wire. Make a circle of 6 pink rondelles on one end of wire and fasten.
Circle 2 - Add 5 rondelles. Wire down through the first rondelle of circle of six and then through first two rondelles of five just added (Figure D).
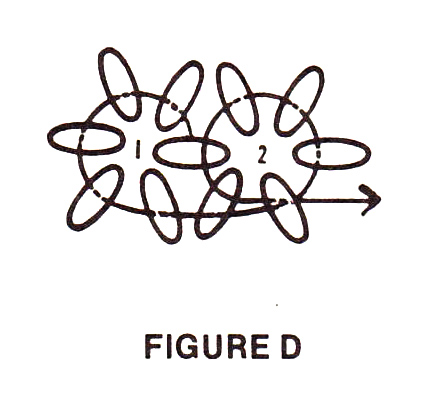
Circles 3-7 - Repeat circle 2.
Circle 8 - Bring wire through four rondelles of five just added.
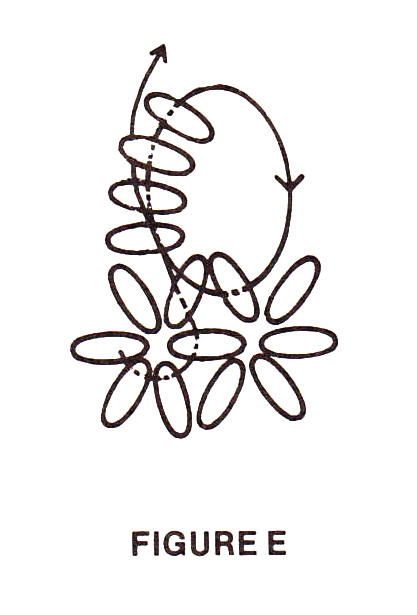
Row 2. Circle 1 - Add 4 rondelles. Wire down through 4th rondelle of circle 7 of previous row and through 5th rondelle of circle 8. Wire through first 3 rondelles just added (Figure E).
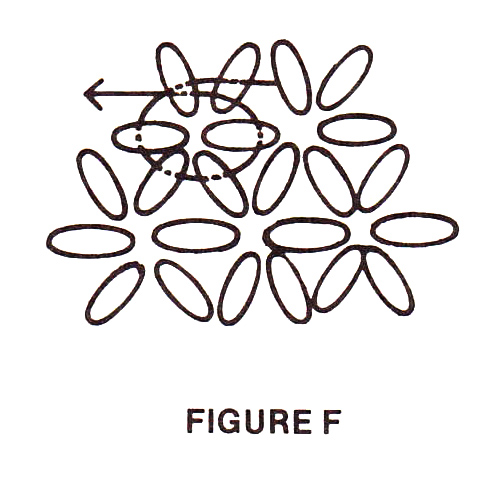
Circle 2 - Add 3 rondelles. Bring wire through 4th rondelle of circle below and to the left, and through 5th rondelle of circle below and to the right. Bring wire through 4th rondelle of circle to the right in same row. Then go through first 2 rondelles just added (Figure F).
Circles 3-6 - Repeat circle 2.
Circle 7 - Repeat circle 2, but wire through only the first of the 3 rondelles just added.
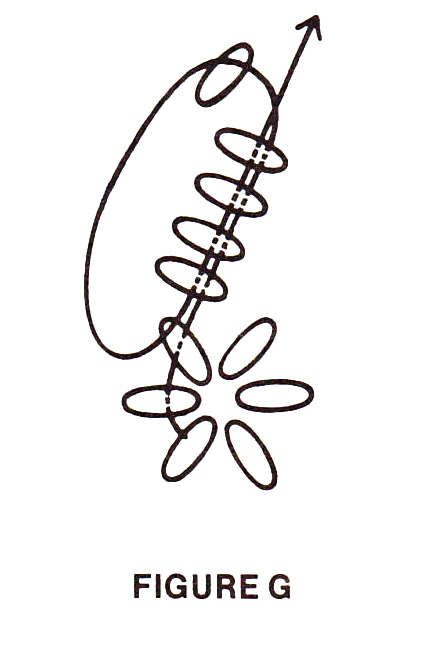
Row 3. Circle 1 - Add 5 rondelles. Bring wire through rondelle from opposite side wire is now coming out of, then through first 4 rondelles just added (Figure G).
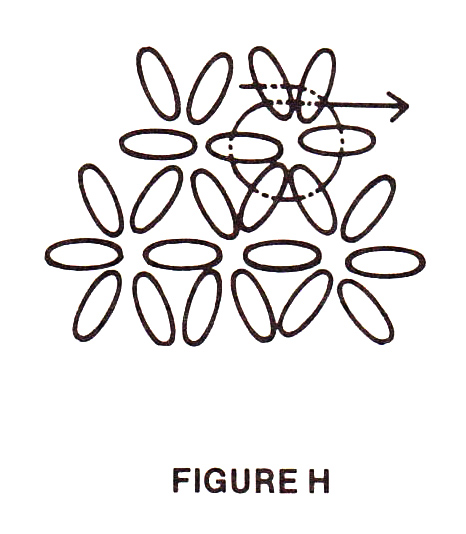
Circle 2 - Add 3 rondelles. Bring wire through 4th rondelle of circle below and to the right and through 5th rondelle of circle below and to the left and through 4th rondelle of circle to the left in same row. Next go through first 2 rondelles just added (Figure H).
Circles 3-6 - Repeat circle 2.
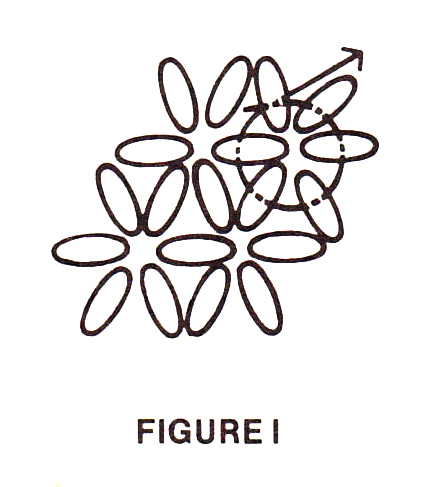
Circle 7 - Add 4 rondelles. Bring wire through 5th rondelle of circle below and to the left, then through 4th rondelle of circle to the left in the same row. Then go through first rondelle just added (Figure I).
Row 4. Circle 1 - Add 4 rondelles. Bring wire down through 2nd rondelle of circle in row below and to the left, then through 3rd rondelle of circle in row below and to the right. Then go through first 3 of 4 rondelles just added (Figure J).

Circles 2-5 - Repeat Row 2, circle 2.
Circle 6 - Repeat Row 2, circle 7.
Row 5.
Circle 1 - Repeat Row 3, circle 1.
Circles 2-5 - Repeat Row 3, circle 2.
Circle 6 - Repeat Row 3, circle 7.
Row 6.
Circle 1 - Repeat Row 2, circle 1.
Circles 2-4 - Repeat Row 2, circle 2.
Circle 5 - Repeat Row 2, circle 7.
Row 7.
Circle 1 - Repeat Row 3, circle 1.
Circles 2-4 - Repeat Row 3, circle 2.
Circle 5 - Repeat Row 3, circle 7.
Row 8.
Circle 1 - Repeat Row 2, circle 1.
Circles 2-3 - Repeat Row 2, circle 2.
Circle 4 - Repeat Row 2, circle 7.
Row 9.
Circle 1 - Repeat Row 3, circle 1.
Circles 2 & 3 - Repeat Row 3, circle 2.
Circle 4 - Repeat Row 3, circle 7.
Row 10.
Circle 1 - Repeat Row 2, circle 1.
Circle 2 - Repeat Row 2, circle 2.
Circle 3 - Repeat Row 2, circle 7.
Row 11.
Circle 1 - Repeat Row 3, circle 1.
Circle 2- Repeat Row 3, circle 2.
Circle 3 - Repeat Row 3, circle 7.
Row 12.
Circle 1 - Repeat Row 2, circle 1.
Circle 2 - Repeat Row 2, circle 7.
Row 13.
Circle 1 - Repeat Row 3, circle 1.
Circles 2 - Repeat Row 3, circle 7.
Row 14.
Circle 1 - Repeat Row 2, circle 1, but go only through first 2 rondelles added.
Row 15.
Circle 1 - Repeat Row 3, circle 1, but go only through first 3 rondelles added.
FASTENING SAIL
To fasten sail to mast, bring wire through 4th rondelle to top circle. Add 1 pink rondelle. Wind wire around mast between top and second white 6mm faceted. Run wire back through pink rondelle just added.
Bring wire down through pink rondelles on straight side of sail to bead on first circle of Row 13. Add 1 pink rondelle and wind wire between 4th and 5th white 6mm faceted of mast. Continue down side of sail the same way, fastening every other row of circles to mast and ending at bottom. Fasten off wire.