Place newspaper down on work surface. Turn flower pot over and glue wooden ball to bottom of pot. When glue is dry, use large paint brush to paint the outside of the clay pot red and the entire wooden ball with flesh colored paint. Let dry and apply a second coat.
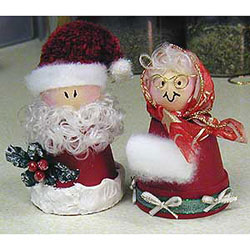
Mrs. Claus - Glue a small amount of white curly doll hair onto head. Use wide sheer ribbon to fashion a scarf around her head so that hair sticks out in the front. Tie in front. Use shiny green ribbon to border the bottom of the pot (see photo), glue in place. Fashion three small white bows from the thin white ribbon, glue to the green ribbon.
Create the hand muff by rolling up a small rectangular scrap of plush felt, glue together, then glue to the body. Using a small sponge, gently dab on a thin amount of pink for the cheeks. using gold craft wire, fashion Mrs. Claus' spectacles and slip onto her face, tucking into the sides of the scarf. After glasses are where you want them, carefully dot on eyes and draw on mouth with fine tip black marker.
Santa - Create cap by wrapping red material completely around the top of the "head", glue brim in place. Trim and tuck material as you move upward to the top of the cap, sealing seams with craft glue until you have reached the top and created a point. Use a strip of plush felt to create a white brim, glue in place. Glue the pom pom to the end of the cap. Bend cap tail to the side, glue if necessary to keep it pointing down.
Use black marker to dot on eyes. Using a small sponge, gently dab on a thin amount of pink for the cheeks. Working in sections, glue white curly doll hair onto Santa's chin creating his beard. Fill in gaps with extra doll hair. Glue holly berries & leaves just above the rim of the clay pot bottom. Use textured snow paint all the way around the bottom rim of the clay pot, dab some onto the holly berries & leaves.