Craft Supplies - Craft Supplies Online - Buy Craft Supplies
Quality Craft Supplies Ranging From the Usual to the Not So Usual, Delivered To Your Door
Excellent Customer Service - Fast Shipping - Online since 1994!

In business since 1985. Online since 1994. We sincerely thank you for supporting family owned, family operated businesses!

Give us a call from 8am to 6pm Mon-Fri. We are available to answer questions or to take your order.
(361) 645-3325

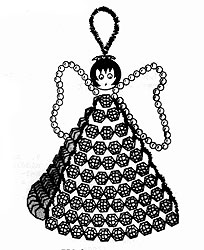
Create This Adorable Beaded Christmas Angel Ornament

The following is a fun, black and white pattern that has been scanned in for you. Unfortunately, it does not link to the craft supplies needed to complete this project. We hope you enjoy it.


We only have hand illustrated pictures available in this project.

If you make this project please share your photos with us. With your permission we'll add it to the page and credit it to you.

Bonus Information You Didn't Ask For
Did You Know?

Pom poms have a much longer history than the craft-store variety might suggest. Decorative tufts of yarn and thread have been used on clothing and accessories for centuries, sometimes as decoration and sometimes to identify particular groups or uniforms. Over time, the pom pom made its way from clothing into home decorating, toys and crafts. Today they range from traditional yarn pom poms to the small, fuzzy craft pom poms available in almost every imaginable color and size.

Gather Your Supplies

Note: To help you locate the material required for this project, some of the materials listed may be linked to this or other websites and may contain affiliate links.

How To Make It

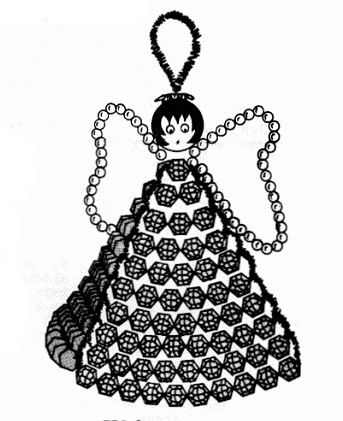
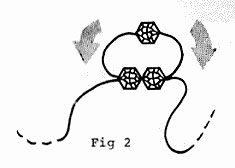
Refer often to the drawings and this will almost make itself

1. Thread 1 - 6mm faceted bead onto one of the 32" pieces of wire. Add 2 more 6mm faceted beads onto one wire (we shall refer to these from here on as separate wires) and bring your other wire through both these beads as shown in Fig 2, as you would in making a ladder pattern.

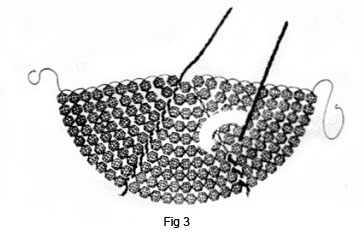
2. The next row, add 3 beads onto one wire, bringing the opposite wire through these 3 beads as you did in the previous step. If you will look at Fig 3 and look at one section, you will notice the looping effect of your wire down the side. Pull your work as tightly as you can without buckling the piece. The first bead will be at the neck edge.

3. Continue working your rows adding 1 bead each row until on your 10th row you end up with a 10 bead row. It will take a total of 55 beads for each section.

4. Make two more sections just like this.

5. Join the sections together twisting your wire together as tightly as possible, then work the loose ends up through the loops of the join.

6. Take one of the Tinsel Stems and wrap it up the juncture as shown in Fig 3. This will become the stem for the head and halo. Join your third section to the first two sections so you have a piece which looks like Fig 3.

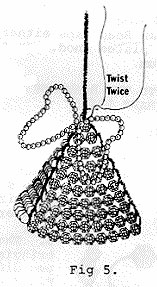
7. Forming a cone, join the first and third sections as in Fig 5 and this becomes the gown of your angel. Put this aside until you have completed the wings.

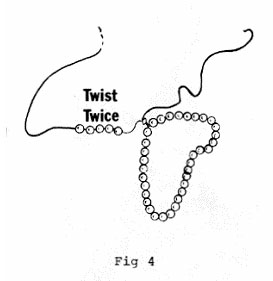
8. Pick up the 12" piece of Size 28 gauge wire and thread 34 of the gold beads onto the wire. Twist this together twice, as tightly as possible. See Fig 4. Now thread another 34 of the same beads onto the remainder of the wire and twist this together.

9. Refer to Fig 5 and keeping a seam in the middle of the back, attach the wing section at the neck by twisting the balance of the Size 28 gauge wire a couple of times around the neck Tinsel Stem. When your angel is complete you can come back and shape her wings.

10. Put a drop of white glue on the wire before each of the next steps.

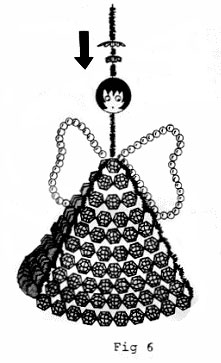
11. Pick up your 20mm wood bead head and slip it down into place on the Tinsel Stem as shown in Fig 6. Slip one of the bead caps into place on her head as shown. Now take the 2nd bead cap and flatten it out and slip this into place on the stem for the top piece of the Halo. Put this aside to dry overnight. The white glue should be a resin type which will dry clear and stay slightly flexible.

After the glue is dry bend the balance of the Tinsel Stem into a hook shape.
Beaded Christmas Angel Pattern

Beaded Christmas Angel Pattern


Beaded Christmas Angel Pattern

Beaded Christmas Angel Pattern

Beaded Christmas Angel Pattern

https://www.bjcraftsupplies.com - Every Pattern Deserves a Few Beads at the End
 
 
A Little Help Keeps the Patterns Coming!
The advertising on our pattern pages helps pay for maintaining our collection and adding more free patterns. If you spot an ad that interests you, please click a look! Your help supports the collection and keeps more free patterns coming. More patterns for you, a little help for us. We think that's a pretty good trade!


Still in the Mood to Make Something?
Browse even more free craft ideas and patterns at
You never know what might catch your eye!


Pin It On Pinterest


Click to verify BBB accreditation and to see a BBB report.


© Copyright, 1994-2026, BJ's Craft Supplies, sister site to Craft Supply Depot, All rights reserved, BJ's Craft Supplies.   661 Abrameit Rd, Goliad, TX  77963.
Click our phone number to call us at (361) 645-3325          p0046