Craft Supplies - Craft Supplies Online - Buy Craft Supplies
Quality Craft Supplies Ranging From the Usual to the Not So Usual, Delivered To Your Door
Excellent Customer Service - Fast Shipping - Online since 1994!

In business since 1985. Online since 1994. We sincerely thank you for supporting family owned, family operated businesses!

Give us a call from 8am to 6pm Mon-Fri. We are available to answer questions or to take your order.
(361) 645-3325

Halloween Ghost Project - Free Craft Instructions

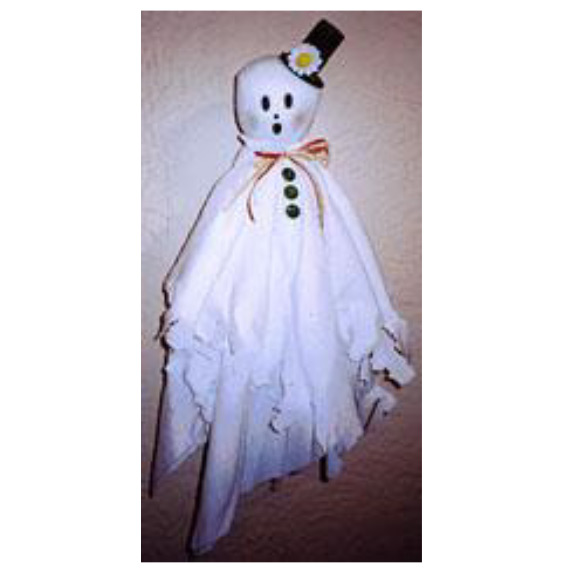
This adorable and inviting halloween ghost can be made in less than an hour. Simple items from around your house and a few inexpensive craft supplies and you'll be on your way to making this dapper ghoul.

If you make this project please share your photos with us. With your permission we'll add it to the page and credit it to you.

Contributed by Amanda Formaro, with permission
Bonus Information You Didn't Ask For
Did You Know?

The word craft has been around for more than a thousand years. Its Old English ancestor referred to strength, skill or knowledge rather than specifically to making decorative things. Over the centuries, its meaning became increasingly associated with skilled work and making things by hand. So when someone becomes good at a craft, they're using the word surprisingly close to one of its oldest meanings: they've developed a skill.

Gather Your Supplies

Note: To help you locate the material required for this project, some of the materials listed may be linked to this or other websites and may contain affiliate links.

How To Make It

Stuff sock with fiberfill to make head and body. Tie off bottom of sock with one of the chenille sticks. Determine the size you would like the ghost's head to be, then wrap a chenille stick tightly around neck to create head. using last chenille stick, thread stick through neck stick, twist to tighten, create a loop, then tuck the ends both in and twist off. You should have a loop to hang your ghost with when through.

Using the black marker, draw on facial features (we used a dry erase marker), then carefully brush on some powder blush for cheeks.

Using a pair of sharp scissors, cut slits all around the fabric square to create a fringe appearance. Cut a 2" x 1/2" oval in the center of both the square and rectangle fabric pieces for head to slip through.

First, put red polka-dotted ribbon together with raffia strands. Place rectangular piece of fabric over ghost's head first, then layer the square piece of fabric over the top of the rectangle. For the collar, lift 1" of the fabric up around the ghost's face and then tie with raffia/ribbon bow around both layers. Trim bow strings if you wish.

Glue buttons onto the front of the ghost's outfit. Cut a circle out of thin cardboard, about 3/4" in diameter larger than the diameter of the film canister, to create the brim of the top hat. Paint brim black, let dry. Glue film canister onto brim, let dry. Glue silk flower onto brim of hat, let dry. Once hat is dry, glue it onto the ghost's head.

Hang in the trees, on the porch, hallway, entranceway, over the fireplace or on the front door.

https://www.bjcraftsupplies.com - Every Pattern Deserves a Few Beads at the End
 
 
A Little Help Keeps the Patterns Coming!
The advertising on our pattern pages helps pay for maintaining our collection and adding more free patterns. If you spot an ad that interests you, please click a look! Your help supports the collection and keeps more free patterns coming. More patterns for you, a little help for us. We think that's a pretty good trade!


Still in the Mood to Make Something?
Browse even more free craft ideas and patterns at
You never know what might catch your eye!


Pin It On Pinterest


Click to verify BBB accreditation and to see a BBB report.


© Copyright, 1994-2026, BJ's Craft Supplies, sister site to Craft Supply Depot, All rights reserved, BJ's Craft Supplies.   661 Abrameit Rd, Goliad, TX  77963.
Click our phone number to call us at (361) 645-3325          p0071